Interface Guide
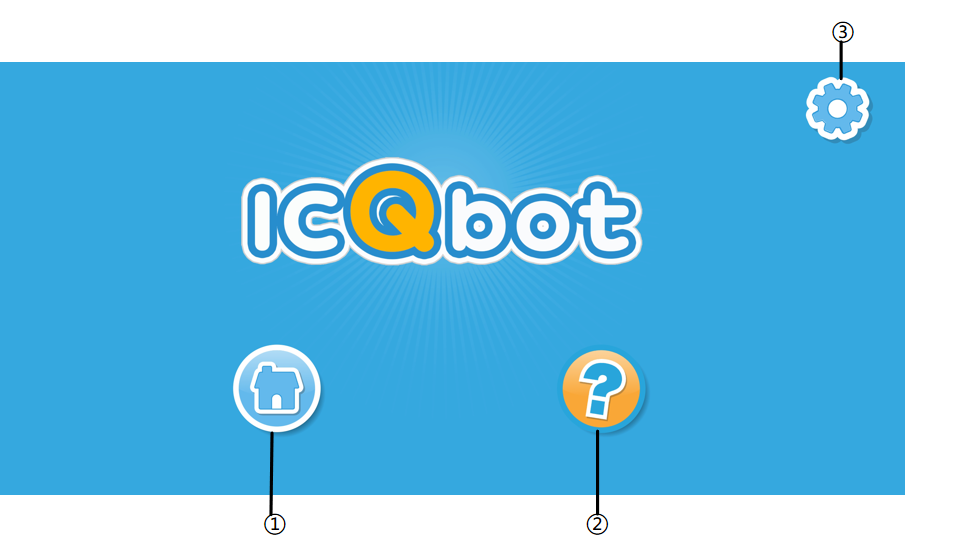
Entering the Cover Page
No. |
Name |
Description |
|---|---|---|
① |
Home |
Click here to enter the project creation and selection page. |
② |
Help |
Click here to play a tutorial video. After closing the video, it will return to the home interface. |
③ |
Settings |
Click here to select the language (Chinese, English, Russian). |
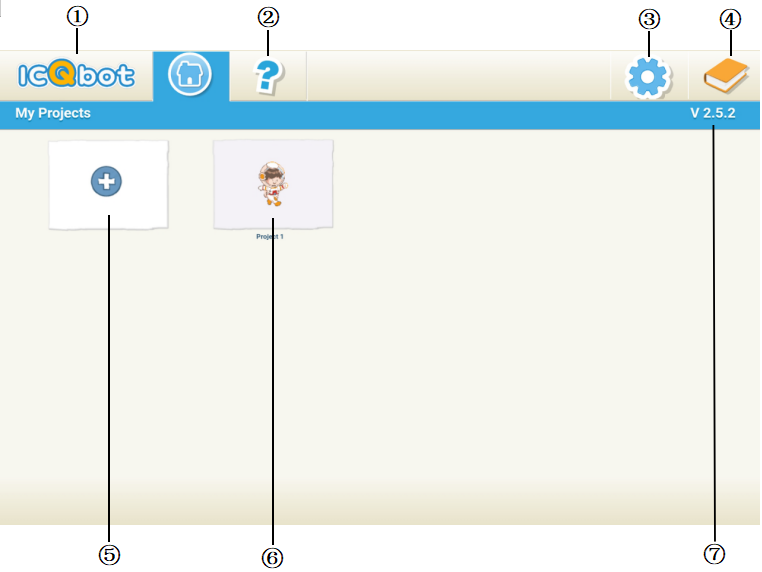
Home Interface
No. |
Name |
Description |
|---|---|---|
① |
Return to cover page |
Click the logo to return to the cover page. |
② |
Help |
Click here to enter the help page. |
③ |
Settings |
Click here to select the language (Chinese, English, Russian). |
④ |
Usage Instruction |
Click here to access ‘About ICQbot,’ ‘Interface Guide,’ ‘Drawing Editor Guide,’ and ‘Block Guide.’ |
⑤ |
New Project |
Click here to create a new blank project. |
⑥ |
Enter Project |
Click here to enter a saved project. |
⑦ |
Version |
Displays the version number of the programming software. |
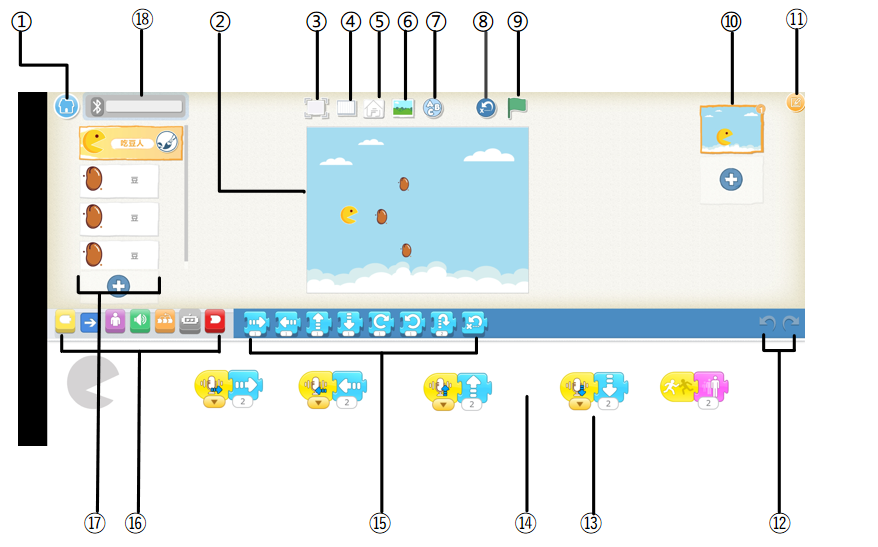
Programming Interface
No. |
Name |
Description |
|---|---|---|
① |
Save |
Save the current project and return to the homepage. |
② |
Stage |
The stage where project characters perform. To delete a character on the stage, press and hold the character, then click the delete icon that appears. |
③ |
Full Screen |
Expand the stage to full screen. |
④ |
Grid Mode |
Click to display or hide the current grid. |
⑤ |
Control Panel |
View information about the currently connected device and the firmware version number. |
⑥ |
Change Background |
Select or draw an image to use as the stage background. |
⑦ |
Add Text |
Input text content on the stage. |
⑧ |
Reset Characters |
Reset all characters to their original positions on the stage (you can drag the character to set the original position). |
⑨ |
Green Flag |
Start all programs that begin with the block “When the green flag is clicked.� |
⑩ |
Page |
Select a page within the project or click the plus icon to add a new page. |
⑪ |
Project Info |
Change the project name, view the project creation date, or share the project. |
⑫ |
Undo & Redo |
Click “Undo” to go back to the previous step. Click “Redo” to redo the last undone operation. |
⑬ |
Program Blocks |
Represented in graphical, block form, users can drag and combine blocks to create programs. Click a block to execute the program. To delete a block, drag it outside the workspace. To copy a program from one character to another, drag and drop it onto another character’s thumbnail. |
⑭ |
Programming Workspace |
A centralized, structured workspace for writing, editing, debugging, and managing programs. |
⑮ |
Block Panel |
Displays available blocks. Click to view the functionality of the modules. |
⑯ |
Block Categories |
Categories program blocks by function: Trigger (yellow), Action (blue), Appearance (purple), Sound (green), Control (orange), End (red). |
⑰ |
Character |
Select a character. Click the plus icon to add a new character. When a character is selected, you can write their program. Click the name to rename the character. Click the brush icon to edit the character’s image. To delete a character, press and hold it, and the delete icon will appear. To copy a character to another page, simply drag it to the thumbnail of the other page. |
⑱ |
Bluetooth |
Click to open the Bluetooth connection window and select the device to connect. |
Drawing Editing Interface

No. |
Name |
Description |
|---|---|---|
① |
Undo |
Use this tool to undo the last action. |
② |
Redo |
Use this tool to redo the last undone action. |
③ |
Shapes |
Select the shape to draw: line, circle, square, or triangle. |
④ |
Character Name |
Displays the character’s name. Click to edit it. |
⑤ |
Cut |
Use this tool to cut a specific shape. After clicking the cut tool, click the character or shape to remove it from the canvas. |
⑥ |
Copy |
Use this tool to copy a specific shape. After clicking the copy tool, click the character or shape to copy and paste it on the canvas. |
⑦ |
Rotate |
After clicking the rotate tool, you can rotate the character or shape on the canvas. |
⑧ |
Drag |
After clicking the drag tool, you can drag the character or shape to the desired location on the canvas. If you select a shape, you can also drag the small dots to modify the shape. |
⑨ |
Cancel |
Cancel drawing edits. |
⑩ |
Save |
Save changes and exit the drawing editor. |
⑪ |
Fill |
Use the fill tool to color a specific area of a character or shape. |
⑫ |
Color |
Select the color for drawing lines or filling shapes. |
⑬ |
Line Thickness |
Change the thickness of the lines when drawing. |
Help Page

No. |
Name |
Description |
|---|---|---|
① |
Introduction Video |
Here you can watch a beginner tutorial video. |
② |
Project Examples |
Learn how to use these two projects to quickly get started. |